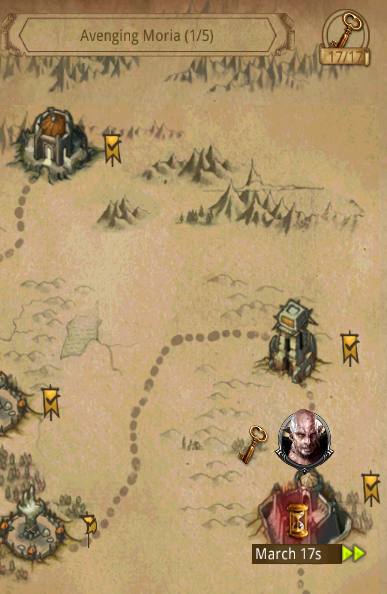
 One of the later additions to the game has been the introduction of temporary campaign maps. These maps appear at seemingly random times every now and then, and disappear again as well after usually a few hours. I thought about including them in the campaign spreadsheet, but seeing as I am not convinced they will be reused, I will write here a small article on how I think you should generally approach these and what the potential rewards are (and they are pretty good).
1. So, what are these maps exactly?
Well, like the introduction says, they are in essence simply campaign maps, that exist for only a couple of hours, and have the potential to drop some really great items, such as the newest set items. But saying just that is only part of the picture, because they differ from the normal campaign maps in a number of places:
1.1 Number of levels
The first difference is minor, but there nonetheless: the number of levels per map part varies quite a bit, and in general, the temporary map parts can have anywhere from 5 to 9 levels to get through.
1.2 Stamina costs
Stamina costs are on average higher compared to the normal campaign maps. For the first 3 parts, some levels will cost 2 or even 3 Stamina points. Usually these are the levels that drop good items and the Boss levels.
But parts 4 and 5 really start taking a toll on your Stamina, with levels costing 2 points minimum, and even up to 5 points for the Boss level in part 5. This makes farming a level multiple times potentially really Stamina costly, but when played right, it’s doable.
1.3 Enemy troop type
As with the Alliance Boss Battles, the later levels of temporary Campaign maps feature the notorious Elite Goblin troops, accompanied by normal Tier 3 Goblins. The lowest levels tend to only have Tier 3 Goblins. All troop types are represented here though, not just Mounted units as is the case in Alliance Bosses.
1.4 Enemy army sizes
The sizes of the enemy army really grow very fast when advancing through the maps. For parts 1-3 it looks pretty normal, with enemy might going towards Smaug and Azog levels of Might, but near the end of the maps, the enemy Might gets really ridiculous, up to multiple millions for the last map (I believe I have seen 13M during the last event!). In short, it is gonna cost you a lot of Might to farm these levels.
1.5 Defeating the enemy/getting drops
I was pretty surprised when I first noticed this, but apparently there is another feature taken from the Alliance Boss battles which is unusual for campaign: You do NOT need to defeat all troops in a level to win! But exactly what the criteria is for winning is unclear to me. I believe the attack is just taking place in 1 round of battle, and as long as you have troops surviving, you win.
This is a good thing, because I didn´t buy thousands of Master Rangers, and only have around 40k from chests and tournaments. And I can tell you that that is not enough to defeat much more than 2/3 of the levels in these maps. That is, with lvl 6 Ent and 240, but still…
But do not worry, the items that CAN drop in a level WILL drop as long as you win. You see that red flag, you are doing just fine!
1.6 The possible/usual drops
Now for some points on the drops throughout these maps. I’ll just list them.
- The RSS drops
RSS drops follow the same path as the enemy army sizes: Starting out really low, but increasing very fast near the end. Final levels drop around 5M of each resource!
- Rare items
Many levels will drop rare KoM items that are worthwhile farming. These items can include Rare and Epic Valto runes, Vala stones, Beorn and Tauriel unlocks, and Mystic Charms for enhancing gear. Drop rates are not THAT great though. Besides that, unlocking each new map part gives a reward as well, such as chests or Stamina Refills.
- Levels with no drops
Yes, watch out for these. There are levels which have no chance to drop any item besides some resources. Logically, only attack these once to advance through the maps.
- Gear
Normally, a few levels have the chance to drop some gear. Sometimes, like with the Nomads temporary map, the focus is on one particular set. In other instances, some levels drop Eldar items, some Wartorn, and other Nomads (or other sets of course). These are pretty good sets to have at least on complete set of, so if you haven’t, you can opt to farm those levels till you do.
You’ll likely see possible gear drops on lower levels as well as higher levels, sometimes for the same set. Keep in mind that the drop rates are understandably lower on the lower, easier maps.
- The Trophy item at the end
Usually, the very last part of a map, and sometimes the very last level, contains one really great item to obtain. In the last events, these were the Ring and Shield of the Void set. At the time of writing, these belong to the top sets in-game, making it very worthwhile to keep hitting until you have obtained them.
2. My strategy in tackling these maps
So now that we know what we can expect from these maps, how do we handle them. Of course, everyone is gonna do it in their way, but here are my tips in playing these maps.
2.1 Unlock all maps at the least and use super runes!
A no-brainer, but unlock at least all maps. It gives you the unlock rewards and a view of what items and gear drop in each level, helping you decide whether to farm a certain level.
Same for RoF and RoI: a no-brainer. If you are gonna go through these maps, they are HIGHLY advised to limit the huge losses in troops you will experience.
2.2 Get the ‘Trophy item’
As mentioned in 1.6, one of the last levels usually contains one REALLY good item, worth farming. Drop rates are usually also not THAT bad, so I advise to at least get this trophy item as well. Also because these items are not yet available through other means or without spending quite some money.
2.3 Get only the gear you really want/need
If you need to complete sets, go farm the levels that drop them. If the gear drops in multiple levels, I stick to the highest level they drop in, as it seems from my experience you get the items quicker at a lower overall might loss. If you already have the gear available, or better gear, do not waste your might on these levels.
2.4 Get only the items you really want/need
Same goes for the rare items that drop: only get what you really need. An example for me personally was getting Tauriel and Beorn unlocked in the last event, which I still needed to do. If you have such a need for an item, go for it and stop once you have them.
I usually do not farm the other items, especially the Rare and Epic Valto runes. They drop to little for the huge might loss, and I rather get them from chests, premium, normal campaign maps and Alliance Bosses.
2.5 If you want quick RSS, go for it
As mentioned, the last levels tend to drop around 5M per resource, so if you need a few million, or even billions of rss, farm the last levels, but beware of the huge might loss. If you are an avid farmer, this is not for you; stick to farming other players, from whom you will probably get more than enough resources already.
2.6 Conclusion
So that is basically how I tackle these maps. I get the items I really want and the unlocks, but more than that? Nope. I see some people farming the hell out of these maps for Valto runes and other items, but it simply is not worth the might loss to me. At least not until Tactical Troops/Stone Giants become trainable and thus more easily replaceable. Any tips and advises can be placed in the comments and they will perhaps be added to the article.

Gani rash
LikeLike
During temp campaigns where Kaboom gives you 50 stamina per potion, roi up and pound Smaug! Get a ton of gear to use for enhancing and the occasional hbc , glass, or token chest, a ROF or and roi. With the free stamina you can hammer smaug for hours. Use porters/Mr or carts/Mr or mammoths/Mr so u won’t lose much might.
LikeLike
If you have massive amounts of supply troops you can send them with all your master rangers. Supply will take all the damage and all rangers survive. You kill goblins without might loss at all.
LikeLike
actually doing that for farming Vala stones, as I dont want to waste giants on that. I basically only train carts atm to make a buffer…
LikeLike
Waths the ratio masterrangers /
supplycars / boss might?
LikeLike
I use around 100-200 Giants per level on Moria 4 and 5. Of course that means 100 at Moria 4 beginning and 200 at Moria 5 end.
Then I add around 60k carts, and fill the rest with Rangers…but you only need 2000 rangers to be sure to defeat the level.
My goal is basically to lose all Giants and around 6k-12k carts per attack. I adjust my precise amount of giants per level to make sure that happens……
LikeLike
Great idea. Tried it out and worked perfect without losing any Master Rangers.
LikeLike