 Welcome to the fourth installment in this Battle Mechanics series. In this part, we will once again take a closer look at Diminishing Returns, how it works, and how it influences our choices for gear and Gems, following the formulas we arrived at in parts I, II and III. Diminishing Returns (henceforth DR) can be a tricky subject, but once you understand how it works it is actually pretty easy to work with.
- Other parts in this series:
- 1. The concept behind DR
- 2. DR visualized
- 3. DR and distribution of buffs and debuffs
- 4. Should you always balance buff and debuff?
- 5. Conclusion on choosing gear with DR in mind
>continued
1. The concept behind DR
 DR at its core is nothing more than the consequences of very basic mathematics, but the effect has been so prevalent throughout gaming, DR has become a phenomenon most people will have heard of. It comes back in every situation in which bonuses are stacked, for example from different gear pieces. So to understand exactly how it works, let’s start with an absolute basic description of DR:
DR means each additional increase in a certain stat has less (relative) additional effect on that stat.
It is difficult to explain it clearly enough in words, much less in one sentence (although I think the one above does capture the essence), so let’s try some examples as well.
Let’s start with just a number: 60. That is gonna represent some stat, doesn’t matter what. Now, we happen to be able to increase this stat with certain items. Say we find two items which give a 50% increase. Important here is that the % increase are calculated based on the base/starting quantity of the stat, in this case the 60 value.
We find the first item and apply it. Our stat increases to 90, a 50% increase, or 30 points. So far so good. Now we apply the second item. Now we have a combined bonus of 100%. We see our stat increase with 30 again, to 120 total. Seems nothing strange is happening, but if we compare situation 3 with both items applied to situation 2 in which one item was applied, the increase in our stat is NOT 50%, but 30/90=33%.
2. DR visualized
(Note: this is basically an extra explanation on top of paragraph 1. If it is already clear, you can chose to move to paragraph 3.)
Let’s look at this again, translated to something more familiar in game. Let’s use attack. First we need some starting number. Note that we can either use attack itself as our stat, or the number of troops we kill in a simplistic battle situation. But let’s go with just attack here. Our base point is arbitrary, as in real battle, it will depend on troop tier, so let’s just use a value of 100. And we are going to use just attack buff. So the formula will simply be Attack = Base*bonus, or Attack = 100*(1+bonus). Again the “+1” factor to never go below 100 base attack.
Now, the following graph shows what happens when we increase this attack stat with 20% bonus at a time. The blue bars show the total attack stat, while the orange line shows the % increase compared to the previous value:
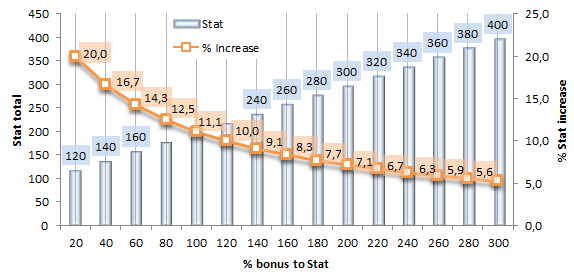
To the left, with the first increase, the total attack becomes 120 (100*120%), and the increase in percents is also 20%. But the very next 20% extra attack, we already see that, compared to the previous total attack (120), we only gain 16.7% extra attack (20/120).
And that in a nutshell is DR. Yes your stats keep increasing when you keep adding those 20%, but the relative increase in the stat diminishes. When you only work with one stat to increase, this notion of DR is present but you don’t bother with it, because you just want to get that single stat as high as possible. But with selecting gear in the Hobbit, we deal with two factors: buff and debuff. Next we will see why this creates a rather large impact for DR on gear choices.
One last comment here because people have also asked me “when” DR begins: DR is ALWAYS present. Even the second single % bonus you add is less effective than the first. DR doesn’t work like some cap but is simply always there, showing up more prominent with higher % of buff or debuff…
2. DR and distribution between buff and debuff
Now that we have an understanding of the basics of DR mathematically, let’s get back to the actual game and focus on gear choices. First recall the last equation(s) for gear choices we arrived at in part III:


Again, (eq.20) for defensive sets, (eq.21) for offensive sets. Both formulas are still rather simple, with two factors being multiplied resulting in a number, named TK here, which serves as a score/indicator on a gear set’s performance. Both individual factors in each formula, buff and debuff, suffer from DR as described in paragraphs 1 and 2.
 BUT, in this case they are also linked, in the sense that, with all the gear and gems we have, we have to make a choice on whether to go for more buff or more debuff. For example, if you do not have eight level VIII Artamirs, but let’s say four, you will have to decide whether to put these in your Ring or in your Shield (for defensive sets), or both. So how do you decide that?
Once again, let’s start with a simple demonstration. We are going to take 2 numbers, A(=1) and B(=1), and they will be multiplied to give an outcome. We get 100% bonus points to distribute/add between the two numbers. What is the best distribution? Let’s plot the results:
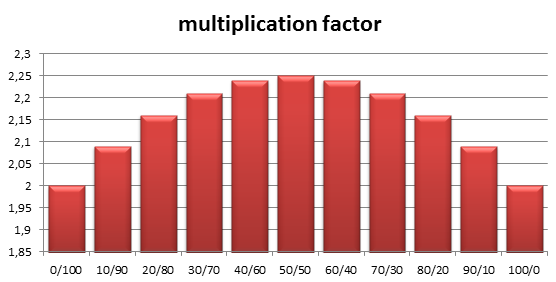
To the far left is the result when giving all 100% to B, on the far right the result for giving all 100% to A. Clearly, the multiplication is highest when we evenly divide the %points between the factors. The same goes with gear. In (eq.20/21) we have a buff and debuff factor, and if we have the opportunity, we must try to balance both out. So if you have a gear set which gives a lot of buff, put your highest gems in the gear piece that gives the accompanying debuff first!
Note that this above, is the exact reason why using Void gear was better than full Replenish. We sacrificed Life buff from Replenish to get some Attack debuff from Void, which evened the buff/debuff out!
4. Should you always balance buff and debuff?
So what is this? In the last few sentences of the previous paragraph I tell you to balance buffs and debuffs, and in the title of the next paragraph I take that into question again? Well…no…and yes…
First, let me say that the rule of thumb is always as stated in par. 3: Always try to balance buff and debuff. BUT the point I want to make here is that you shouldn’t do it at ANY cost. What I mean by that is that you ALSO want to keep both buff and debuff as high as possible of course!
If your buff is higher than your debuff, an item which gives a large enough extra buff can still be better than an item which gives a lower extra debuff, to even out buff/debuff. Say you have 80% buff and 100% debuff.
- Stat = 1.8 * 2.0 = 3.60
If you can add 20% to either buff or debuff (for example with uneven level Gems), where do you put it? You put it in buff of course, because:
- Stat = 2.0 * 2.0 = 4.00 is higher than
- Stat = 1.8 * 2.2 = 3.96
But what if you can add EITHER 20% buff, OR 30% debuff? At first glance we might be tempted to add the 20% buff, evening out the buffs and debuffs. BUT, because the increase in debuff is much higher, it outperforms the smaller buff increase:
- Stat = 2.0 * 2.0 = 4.00 OR
- Stat = 1.8 * 2.3 = 4.14
In this case, going for the larger debuff increase is better, even though it actually makes buff/debuff distribution more uneven. So when do you even out and when do you go for the larger increase? That totally depends on where your buffs are at before applying the increase. As a rule of thumb, the larger the difference between buff and debuff, the more worthwhile it becomes to increase the lower of the two to even them out.
If for example we would have started with 40% buff and 120% debuff, we see that a 20% increase in buff outweighs 30% debuff increase:
- Stat = 1.6 * 2.2 = 3.52, versus
- Stat = 1.4 * 2.5 = 3.50
5. Conclusion on choosing gear with DR in mind
In my mind I like to think that I have covered DR in such a way it should answer all questions concerning it in light of the Hobbit. So in choosing your gear sets, keep the following rules of thumb in mind, concerning DR:
- Try to even out buff and debuff,
- 1b. but also try to get both as high as possible
- Sometimes a large increase in the higher buff/debuff can outperform a smaller increase in the lower of the two
- The larger the difference between buff/debuff, the more effective an increase in the lower stat becomes
- ALWAYS do the math yourself (like in Excel), using (eq.20) and (eq.21) to check the results
- Try to even out buff/debuff differences in gear sets with differences in Gem levels,
- 5b. but, always use your highest Gems
 The last point I didn’t touch upon in the article yet, but should be self-explanatory: If your Life buff is higher than your Attack debuff, and you have 4 lvl VIII Artamirs and 4 lvl VII Artamirs, put the VIII’s in your Ring first to increase Attack debuff more to even out buff/debuff. Once they are even, divide the remaining Artamirs between Ring and Shield.
But, if you have 8 lvl VIII Artamirs, NEVER substitute an VIII for a VII “to even buff/debuff out”. In that case, rule 1b (“both should be as high as possible“) becomes more important.
And with that I have covered all I want to say about DR ever again. In part V I will give a small summary of all the parts in this series. But I hope I have given you enough insight into gear choices that you can start to make your own choices. And if it is too much work, simply follow the Best Sets article and use that as a starting point. But at least now you should understand how DR works and why certain choices are made.
Happy Hobbiting!

Pingback: w5840
how is the final Life and attack calculated. adding in the city buffs, hero level, research and so on?
LikeLike
This post is great! The multiple examples will really help people understand not only why DR matters, but why it isn’t cut and dry that you always balance.
I guess one more example on DR might be useful right now: why we see diminishing returns on each round of gems and why it’s actually a _good_ thing they double in percent value, otherwise DR would make them even more incremental than they already are. By the time we get to Artamir X, I fear even a few may not influence CHS scores. (Partly because of DR and partly because you need an ever increasing percent change to lose just one more SG. e.g. 10SG lost to 9SG lost needs only a 10% overall increase in defense, whereas going form 5SG to 4SG needs a 20% overall increase… which gets harder as overall returns are diminished, not just balanced returns.) The people that have IXs now aren’t suddenly getting massive ratio over those without 9s.
LikeLike
thanks man. But, I dont think I agree with the Gems part. I’d rather would’ve seen them increase more linear instead of exponential. The gap created between players when new Gems are released is simply to great, ruining things like TK (even more). You say level X wont affect CHS? Youre wrong, it will be a massive increase. In fact, with the gems doubling/being exponential, they will continue to have the same general effect after release. With Artamirs doubling every round, they will never become useless…which is why a more linear approach would fit much better IMO
LikeLike
Cosmo, im doing the same maybe we can exchange or work together.
LikeLike
did you guys speak to each other already?
LikeLiked by 1 person
Good stuff, I understand now how this concept works. I am working on a full battle & CHS simulator – it’s more of an Excel project than a game one (my interest in the game is diminishing rapidly) and I’m finding places where the information you provide here naturally fits in. Thanx again!
LikeLike