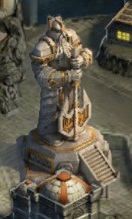
 As soon as you open your city, it’s there: The City Guardian. A large statue in the middle of your city, seemingly more decorative than functional. But the City Guardian actually functions as a protector of your City, providing very useful buffs that will certainly help even the most experienced players. In this article, I delve a little deeper into the Guardian and give an overview of how it functions.
1. Basic Information
So let’s go over some of the basics behind the Guardian statue:
- Each city has a Guardian statue right from the start
- The Guardian cannot be leveled up like other buildings
- The Guardian can also not be destroyed
- The Guardian provides four buffs:
- Ferocity/attack
- Resilience/life
- Activation/troop training speed
- Resource production
- Buffs can be leveled up with artifacts, for which materials come from either campaign or Alliance Bosses
- A Guardian’s buffs only count towards the City in which the statue stands
2. Buffs
As you can see, the main purpose of the Guardian is providing each city with its four buffs. The primary buffs the Guardian offers are attack and life buffs for your troops defending a city or marching from it. And although the buffs might seem a bit low compared to the combined buffs from gear, runes and hero, they still make a difference, and top players make sure to max their Guardian statue as soon as possible.
2.1 Ferocity and Resilience
 I’m tackling these two together as they only differ in the effect they have and nothing else. The Ferocity and Resilience buffs are arguably the two most valued buffs given by the Guardian. They provide buffs for attack and life to troops defending the city or marching from it. Each buff level increase attack or life with 1%, meaning 10% is the max for these
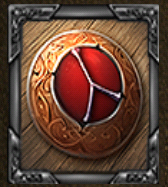
Materials
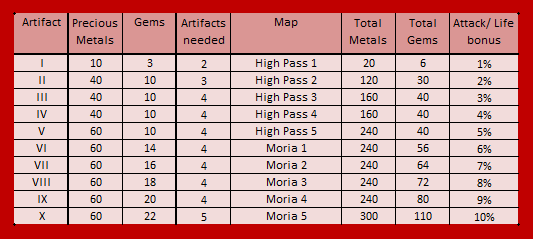
The Ferocity and Resilience buff can be upgraded with Artifacts I to X, which can be traded for in the Sage Tower. Each Artifact needs Precious Metals and Precious Gems to make/trade, and each additional level needs more materials to make, while at the same time, more Artifacts are also needed to upgrade the Guardian.
Materials for Artifact I to V drop from parts 1 to 5 in High Pass campaign map, while metals and gems for Artifact VI through X drop from parts 1(VI) to 5(X) in Moria. Each map part drops materials for the corresponding Artifact. Metals drop from normal maps, while Gems drop from the Boss levels. Metals drop more often than Gems, but more of them are needed per Artifact. For the first 6 Artifacts, Metal drops in 2 or 4 stacks, but this drops to single drops in later parts of Moria.
2.2 Activation
 Activation is similar to the Ferocity and Resilience buffs, and materials are also acquired in campaign. Instead of attack and life, this one buffs the troop training speeds in the Guardian’s City. The difference with the previous buffs is in the fact that Activation knows 5 instead of 10 levels, which buff 10% per level, for 50% bonus max.
Materials
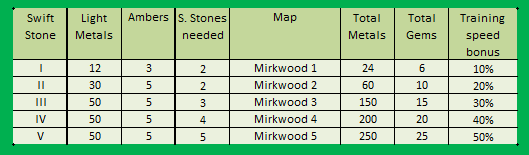
Activation can be upgraded with the help of Swift Stones, which can also be traded in the Sage Tower. Instead of Precious Metals and Gems, the materials for these Stones are Light Metals I through V and Amber I through V. Like with Artifacts, the number of Swift Stones needed plus the materials needed to craft/trade them increases with level.
Light Metals and Ambers I through V drop from the corresponding parts one the Mirkwood campaign map. As with Metals and Gems, the Light Metals drop from the normal maps per part, while the Ambers are farmed from the Boss levels. Metals drop more often than Ambers, but more Metals are also needed per Swift Stone, such that the required amounts of Ambers and Light Metals take roughly the same time to farm.
2.3 Resource Collection
 The Resource collection buff does just what its name suggests: provide a buff to the resource production from your farms, mines, quarries and wood camps. Similar to the Activation buff, this buff can be upgraded to level 10 max, where each level adds a 10% bonus to all resource production for a 100% max bonus.
Materials
Acquiring the materials for this buff differs from the other buffs. Firstly, there are no Artifacts or Stones to be traded in the Sage Tower. The materials needed are Gatherers Stones. These Stones have chance to drop from Alliance Bosses when they are defeated.
Logically, the Stones drop from maps which can have an Alliance Boss summoned: High Pass, Mirkwood and Moria. Gatherers Stones I through V drop both from the bosses corresponding to parts I trough V on the High Pass and Mirkwood maps, while Stones VI through X drop from the bosses summoned on Moria. Because farming Alliance Bosses is rather difficult with the 4 hour attack timer respawn, upgrading four or five cities to level 10 can be quite time consuming.

Do the attack and life buffs work on campaign then?
LikeLike
as far as I know yes
LikeLike
How do I get an Alliance identity , want to rename but it keeps telling me I kack sufficient identity.
LikeLike
I think you only got one to use after the merge? But Im not sure, Im not a R or VR..
LikeLike
Is there a strength difference between ferocity/resilience and battle crys/shield walls? If so what’s the difference? Or are they both equal on %?
LikeLike
Havent done any testing on that. It would seem this isnt the case, but some people do say that 1% guardian actually helps more than 1% buffs, but I do not know for sure yet…
LikeLike
Just wondering if there is a combination of specific troops to attack maps so that these metals drop easier?? Or is it hit or miss?? Wondering how to increase chances of getting them??? Thanks
LikeLike
hit or miss, chance based. For the earlier levels in Moria and High Pass which drop 2 and 4 stacks, my average seems to be about a metal per attack, or 20 per refill, give or take.
LikeLike
Worth noting, more established players who like to stack their training queues may be better off NOT upgrading training speed. Also, assuming most people know this but you get a prize (2 gathering stones and other good/bad junk) for defeating a boss but also if you were the one who summoned it or had attacked it and not killed it (assuming someone else killed it within the 6 hours). Those chests only last for 24 hours and have to be collected for them to appear in your inventory. Summon as many bosses as you can whenever you can (there can be up to 15 in total) and if your alliance likes to kill bosses you summoned you can upgrade much faster than you would just by killing a boss every 4 hours. Sometimes i click on the rewards button and have 5-10 chests waiting to be collected. Of course, sometimes i also waste a lot of Stamina calling them and no one kills them so it can go either way.
LikeLike
Hi, please correct:
For 10% Ferocity/Resilience – you need 5 artifacts
For 10% Activation – you need 2 artifacts
LikeLike
Correct on the activation and thanks for the fero/res info!
LikeLike
ty
LikeLike
yw
LikeLike
Anyone know for sure if the resource collection buff works for pearls in Laketown?
LikeLike
99% sure
LikeLike
100%
LikeLike